Steps for Linux vsftpd Install, Configuration, Users Setup
vsftpd also supports virtual ip, virtual users, bandwidth throttling, IPv6, encryption etc.,
This article provides step-by-step instructions on how to setup vsftpd on your server from source.
1. Download vsftpd Source
Go to vsftpd download site and scroll down to download the latest version of the vsftpd. Or use wget to download it directly on your server.# wget ftp://vsftpd.beasts.org/users/cevans/vsftpd-2.3.2.tar.gz
2. Compile vsftpd source
Compile the vsftpd source as shown below.# tar xvfz vsftpd-2.3.2.tar.gz # cd vsftpd-2.3.2 # makeAfter the make command executes successfully, you’ll see vsftpd file getting created in the current directory.
# ls -l vsftpd
3. Install vsftpd on Linux
You can either move the vsftpd file manually to /usr/local/sbin directory and set appropriate permissions, or execute the make install as shown below.# make install
if [ -x /usr/local/sbin ]; then \
install -m 755 vsftpd /usr/local/sbin/vsftpd; \
else \
install -m 755 vsftpd /usr/sbin/vsftpd; fi
if [ -x /usr/local/man ]; then \
install -m 644 vsftpd.8 /usr/local/man/man8/vsftpd.8; \
install -m 644 vsftpd.conf.5 /usr/local/man/man5/vsftpd.conf.5; \
elif [ -x /usr/share/man ]; then \
install -m 644 vsftpd.8 /usr/share/man/man8/vsftpd.8; \
install -m 644 vsftpd.conf.5 /usr/share/man/man5/vsftpd.conf.5; \
else \
install -m 644 vsftpd.8 /usr/man/man8/vsftpd.8; \
install -m 644 vsftpd.conf.5 /usr/man/man5/vsftpd.conf.5; fi
After make install, make sure the vsftpd file is copied to /usr/local/sbin directory.# ls -l /usr/local/sbin/vsftpd -rwxr-xr-x 1 root root 107652 Oct 30 20:23 /usr/local/sbin/vsftpd
4. Copy vsftpd man pages to /usr/share/man/man8, man5
You might get the following make install error messages because /usr/local/man/man8 and man5 directory does not exist.install: cannot create regular file `/usr/local/man/man8/vsftpd.8': No such file or directory install: cannot create regular file `/usr/local/man/man5/vsftpd.conf.5': No such file or directory make: *** [install] Error 1Copy the man pages manually to the /usr/share/man/man8 and man5 directory as shown below.
# cp vsftpd.8 /usr/share/man/man8/

# cp vsftpd.conf.5 /usr/share/man/man5/
5. Copy vsftpd.conf configuration file
vsftpd comes with a default configuration file. Copy this vsftpd.conf to /etc directory.# cp vsftpd.conf /etc
6. Setup Anonymouse FTP access for vsftpd
Make sure ftp user already exists.# grep ftp /etc/passwd ftp:x:14:50:FTP User:/var/ftp:/sbin/nologinCreate /var/ftp directory and set appropriate privileges.
#  mkdir /var/ftp/

# chown root.root /var/ftp

# chmod og-w /var/ftp
Login using anonymous (or ftp user) to make sure it works as shown below.
# ftp localhost
Connected to dotcom.
220 (vsFTPd 2.3.2)
530 Please login with USER and PASS.
KERBEROS_V4 rejected as an authentication type
Name (localhost:root): anonymous
331 Please specify the password.
Password:
230 Login successful.
Remote system type is UNIX.
Using binary mode to transfer files.
ftp>
At this stage, if you try to login with any other account (except anonymous, and ftp), it will fail as shown below.
# ftp localhost
Connected to dotcom.
220 (vsFTPd 2.3.2)
530 Please login with USER and PASS.
KERBEROS_V4 rejected as an authentication type
Name (localhost:root): ramesh
530 This FTP server is anonymous only.
Login failed.
ftp>
7. Allow UNIX logins to use vsftp
You might want to setup ftp users other than anonymous or ftp. You can allow Linux login account to be used to access the vsftpd server.First, copy the vsftpd.pam template provided along with the source code to the /etc/pam.d/ftp directory
# cp RedHat/vsftpd.pam /etc/pam.d/ftpRemove the comment from the local_enable parameter in the /etc/vsftpd.conf file. i.e local_enable should be set to YES to allow local Unix accounts to be used to login from the ftp.
#local_enable=YESKill the running vsftpd, and restart it again. Now, try to login again with a Linux user account using the ftp and it should work.
# ps -ef | grep vsftpd

# kill -9 {vsftpd-pid}

# /usr/local/sbin/vsftpd &

# ftp localhost
Connected to dotcom.
220 (vsFTPd 2.3.2)
530 Please login with USER and PASS.
KERBEROS_V4 rejected as an authentication type
Name (localhost:root): ramesh
Password:
230 Login successful.
Remote system type is UNIX.
Using binary mode to transfer files.
ftp>
=====================================================================================
Step by step Configuration of Secure FTP Server on Linux
Fedora 6 to 14, rhel 5.0,to 5.5 & Centos 5.0 to 5.5
STEP 1: Setup VSFTPD
1 | [root@linux8 ~]# yum install vsftpd* |
1 | [root@linux8 ~]# vi /etc/vsftpd.conf |
anonymous_enable=NOSTEP 3: Enable SSH2 Encription on FTP Server
local_enable=YES
write_enable=YES
local_umask=022
dirmessage_enable=YES
xferlog_enable=YES
connect_from_port_20=YES
xferlog_std_format=YES
#You may fully customise the login banner string
ftpd_banner=Welcome to Minor Addition FTP.
listen=YES
pam_service_name=vsftpd
userlist_enable=YES
tcp_wrappers=YES (save & Exit)
To enable TLS/SSL security controls
1 | [root@linux8 ~]#ldd /urs/sbin/vsftpd | grep ssl |
libssl.so.6 => /lib/libssl.so6 (0*001bf000)STEP 4: Generate certificate key for encryption<
1 | [root@linux8 ~]#cd /etc/pki/tls/certs |
2 | [root@linux8 ~]#make vsftpd.pem |
Country Name : INNote: The vsftpd.pem file should be secured so only owner has access to the file. This file does not affect the server if it is running as a non privileged account, as the keys are loaded before dropping into non privileged mode.
State of province name(full name) : Atul Sharma
Locality Name (eg,city) : Guildford
Organization Name : Tactical Value.
Organizational Unit Name : Centos Server
Common Name (eg,your name or your server’s hostname) : ixlinux1
Email Address : sysadmin@minoraddition.com
1 | [root@linux8 ~]#cat /etc/pki/tls/certs/vsftpd.pem |
2 | [root@linux8 ~]#openssl x509 -in /etc/pki/tls/certs/vsftpd.pem -noout -text |
3 | [root@linux8 ~]#chmod 600 /etc/pki/tls/certs/vsftpd.pem |
1 | [root@linux8 ~]#vi /etc/vsftpd/vsftpd.conf |
ssh2 configureationNow we have to restart service
ssl_enable=YES
allow_anon_ssl=NO
force_local_data_ssl=NO
force_local_logins_ssl=YES
ssl_tlsv1=YES
ssl_sslv2=NO
ssl_sslv3=NO
rsa_cert_file=/etc/pki/tls/certs/vsftpd.pem
1 | [root@linux8 ~]# /etc/init.d/vsftpd restart |
The Linux clients use gftp, filezilla.
The windows clients use filezilla.
Use SSH2 & Port 22 while making connection.
==================================================
How to Set up an FTP Server in Ubuntu Linux
Edited by Maniac and 24 others
This wikiHow article will show
you how to set up your own FTP server in Ubuntu Linux. FTP has a
multitude of uses, such as setting up your own file storage website or
your own file storage computer, among other purposes. Here's how to do
it.
Edit Steps
- 1Boot up Ubuntu Linux.
SoftLayer® Is Here
Cloud, dedicated, & managed hosting New Singapore Data Center
SoftLayer.com/Asia-Pacific - 2Go to Application, then select Accessories and chose Terminal

- 3Enter the following command: “sudo apt-get install vsftpd” (without quotation marks). This will install the FTP server on your system. Remember you must be run this command on the root user.

- 4Open the FTP server configuration file. To do so, go to Places and click on Computer.

- 5In the file browser, click the “File System” icon.

- 6Click on the “etc” folder.

- 7Double-click the “vsftpd.conf” icon.

- 8Alter anonymous access. Enter "anonymous_enable=YES" (without quotation marks) to allow anonymous FTP access. While you're at it, you can remove the hash (#) from the start of each command by entering "write_enable=YES" (without quotation marks).

- 9Rename the FTP welcome banner. Uncomment it by removing the hash (#), and enter the welcome message. For this example it's "ftpd_banner=Welcome to FTP Server!" (without quotation marks).

- 10Click on Save and close the file.

- 11To restart the server, enter the following command: “sudo /etc/init.d/vsftpd restart” (without quotation marks).

- 12Place files on the FTP server. To move files to the serve,r access the FTP Folder from the command in the image below.


File Transfer Protocol (FTP) is a standard network protocol used to transfer files from one host to another host over the TCP based network such as internet. It enables easy file sharing over the network with security. Here i am going to install FTP in rpm based machine. For example: Redhat Enterprise Linux . You can access FTP from both the Command Line Interface mode and GUI mode.
Before installing FTP you must configure the yum
on your machine, your system must be configured with ip address and it
is must. Configure both server and client by the following way.

Server Configuration
Here i am using Redhat Enterprise Linux 5 Server Operating System.
1. Open Terminal in root user mode.
2. Query the ftp package.
#rpm -qa | grep ftp
3. If the package is installed leave it else install it by using the following command.
#yum install vsftpd
vsftp means ” Very Secure File Transfer Protocol “.
4. After the installation over, restart the services.
# service vsftpd restart
5. Now configure the ftp file in the configuration directory.
# vi /etc/vsftpd/vsftpd.conf
” Change the ‘ anonymous_write = no ‘ to ‘ anonymous_write = yes ‘ and add this ‘ write_enable = yes ‘ “. Save ( Esc + : + wq ) and quit it now.
The default username for any FTP server is ‘ anonymous ‘.
6. Now again restart the service.
# service vsftpd restart
In some cases firewall does not allow the ftp port, So change the firewall settings. To change the firewall settings
# service-config-firewall
and finally chkconfig the vsftpd ( It allows permanent FTP connection )
# chkconfig vsftpd on
Now test FTP with an another client.
7. Open Terminal ( Command Line Interface )
# ftp < client ip address >
username : anonymous
password : < no default password, so just hit retun to continue >
Now your server ping the client ftp directory and the prompt is changed to ftp>
ftp> ls
ls – list the files in the directory.
Shows the files in the /var/ftp/pub. This is the default direcory for all rpm based distributions.
The server configuration is over.
Client Configuration
1. Open the Terminal in root user mode and ping with the server ip address, for checking the connectivity.
# ping < server ip address>
2. Change the directory
# cd /tmp
3. Now establish the FTP connection
# ftp <server ip address >
ex : ftp 192.10.25.36
( Same user name and password )
4. To download a file from the server – get command is used
#ftp> get helpfile
It downloads a file from server’s /var/ftp/pub to client’s /tmp
5. To upload a file to server – put command is used
#ftp> put help
It upload a file from client’s /tmp to sever’s /var/ftp/pub
Some of the ftp commands are :
get – Download a single file
mget – Download multiple files
put – Upload a single file
mput – Upload multiple files
===================================================
How to setup vsftpd FTP on Ubuntu Linux
vsftpd is a GPL licensed FTP server for UNIX systems, including Linux. It is secure and extremely fast.
Using this instructions, you can set up vsftpd on variuos linux distros. This tutorial will show you how to set up your own ftp in Ubuntu Linux.
1. Install vsftpd
2. Change the configurations file
Open the vsftpd.conf configuration file with a text editor. The file is located in the /etc directory.
Once you are editing the file, you’ll want to make a few changes. Change this:
To this:
This will disallow anonymous access to your FTP server. Unless you
have a really good reason for permitting anonymous access, and you know
what you’re doing in terms of network security, I’d recommend leaving
the anonymous access off. Especially if your Ubuntu FTP server is
sitting on the Internet.
Of course, with anonymous access off, you’ll need to permit local users to log in. Do this by changing this directive:
To this:
(Putting a # in front of a line disables it; this is called “commenting it out”.)
3. Adding a “fake” shell
Edit the /etc/shells file and add a non-existent shell name like /bin/false, for example. This fake shell will limit access on the system for FTP users.
/bin/false is our added no-existent shell. With Red Hat Linux, a special device name /dev/null exists for purposes such as these.
4. Setup an FTP user account
It’s important to give to your strictly FTP users no real shell account on the Linux system. In this manner, if for any reasons someone could successfully get out of the FTP chrooted environment, it would not have the possibility of executing any user tasks since it doesn’t have a bash shell. First, create new users for this purpose.
This has to be separate from a regular user account with unlimited access because of how the chroot environment works. Chroot makes it appear from the user’s perspective as if the level of the file system you’ve placed them in is the top level of the file system.
Use the following command to create users in the /etc/passwd file. This step must be done for each additional new user you allow to access your FTP server.
- The mkdir command will create the ftp/ftpuser directory under the /home directory to handle all FTP users’ home directories we’ll have on the server.
- The useradd command will add the new user named ftpuser to our Linux server.
- Finally, the passwd command will set the password for this user ftpuser.
Once you’ve made these changes, restart the vsftpd service with this command:
5. Override config option specified in the manual page, on a per-user basis (optional)
If you want to make custom changes in the behaviour of the ftp server on a per-user basis, you should know that vsftpd has a powerful option that allows you to do this.
If you set user_config_dir to be /etc/vsftpd_user_conf and then log on as the user “chris”, then vsftpd will apply the settings in the file /etc/vsftpd_user_conf/chris for the duration of the session. The format of this file is detailed in the manual!
Please note that not all settings are effective on a per-user basis. For example, many settings only prior to the user’s session being started. Examples of settings which will not affect any behviour on a per-user basis include listen_address, banner_file, max_per_ip, max_clients, xferlog_file, etc.
===============================================Using this instructions, you can set up vsftpd on variuos linux distros. This tutorial will show you how to set up your own ftp in Ubuntu Linux.
1. Install vsftpd
sudo apt-get install vsftpd |
2. Change the configurations file
Open the vsftpd.conf configuration file with a text editor. The file is located in the /etc directory.
sudo joe /etc/vsftpd.conf |
anonymous_enable=YES
|
anonymous_enable=NO
|
Of course, with anonymous access off, you’ll need to permit local users to log in. Do this by changing this directive:
#local_enable=YES |
local_enable=YES
|
3. Adding a “fake” shell
Edit the /etc/shells file and add a non-existent shell name like /bin/false, for example. This fake shell will limit access on the system for FTP users.
sudo joe /etc/shells |
# /etc/shells: valid login shells /bin/sh /bin/bash /bin/false |
4. Setup an FTP user account
It’s important to give to your strictly FTP users no real shell account on the Linux system. In this manner, if for any reasons someone could successfully get out of the FTP chrooted environment, it would not have the possibility of executing any user tasks since it doesn’t have a bash shell. First, create new users for this purpose.
This has to be separate from a regular user account with unlimited access because of how the chroot environment works. Chroot makes it appear from the user’s perspective as if the level of the file system you’ve placed them in is the top level of the file system.
Use the following command to create users in the /etc/passwd file. This step must be done for each additional new user you allow to access your FTP server.
sudo mkdir -p /home/ftp/ftpuser sudo useradd ftpuser -d /home/ftp/ftpuser/ -s /bin/false sudo passwd ftpuser |
- The useradd command will add the new user named ftpuser to our Linux server.
- Finally, the passwd command will set the password for this user ftpuser.
Once you’ve made these changes, restart the vsftpd service with this command:
sudo /etc/init.d/vsftpd restart |
If you want to make custom changes in the behaviour of the ftp server on a per-user basis, you should know that vsftpd has a powerful option that allows you to do this.
If you set user_config_dir to be /etc/vsftpd_user_conf and then log on as the user “chris”, then vsftpd will apply the settings in the file /etc/vsftpd_user_conf/chris for the duration of the session. The format of this file is detailed in the manual!
Please note that not all settings are effective on a per-user basis. For example, many settings only prior to the user’s session being started. Examples of settings which will not affect any behviour on a per-user basis include listen_address, banner_file, max_per_ip, max_clients, xferlog_file, etc.
Install FTP Server with vsftpd on Ubuntu 12.04 Precise Pangolin
FTP stands for “file transfer protocol”, and it allows you to transfer files to a remote computer. FTP has been around forever, and it has a number of pros and cons. Since FTP is so old, it is supported on virtually every operating system, and most operating systems include an FTP client of some kind. Ubuntu 12.04 Precise Pangolin can act as an FTP server with a reasonable degree of security. In this post, we’ll show you how to set up Ubuntu 12.04 Precise Pangolin as an FTP server.The most common FTP server software for Ubuntu is the vsftpd package, which stands for “very secure FTP daemon.” It’s the default FTP package for Ubuntu 12.04 Precise Pangolin, and most other Linux distributions as well. As an added bonus, vsftpd is pretty secure out of the box – to make it insecure, you have to go out of your way to mess up the configuration file.
As an added bonus, vsftpd is simple to install and configure on a Ubuntu 12.04 Precise Pangolin machine. To install the vsftpd package, make your way to a command prompt and type this command
sudo apt-get install vsftpd
Enter your password to authenticate and apt will download and install vsftpd for you.
Follow the default prompts, and the vsftpd server will be installed on your computer. Generally, the default configuration for vsftpd is pretty secure, and good enough for casual use. Anonymous users are allowed, but no one can write files to the server (or, in FTP terminology, no one can upload files to the server). However, this configuration isn’t very good if you want people to be able to write files to the server, so we’ll show you how to securely set that up by changing vsftpd’s settings.
If you want to change any settings, the configuration file for vsftpd is /etc/vsftpd.conf. Like any other configuration file, you can edit it with vi:
sudo vi /etc/vsftpd.conf
The vsftpd.conf file contains a large number of “directives” that govern how the server behaves and operates. If you want to change its configuration, you’ll need to alter the directives.
If you want people with local user accounts on the FTP server to be able to connect via FTP (you usually do), you will need to change this directive:
#local_enable=YES
To this:
local_enable=YES
If you do not change this directive, only anonymous users will be able to log into your FTP server, which is bad. (More on that below.)
If you want users to be able to write files to your FTP server, change this directive:
#write_enable=YES
To this:
write_enable=YES
With the write_enable directive set to YES, users will be able to upload files to your FTP server. Note, however, that they will only be able to do so if they have proper permissions to the directories in question. They’ll be able to upload files to their home directories, but not, for instance /var or /usr.
Anonymous access is controlled with this directive:
anonymous_enable=NO
Under no circumstances should you allow anonymous access to your FTP server, especially if it is accessible from the Internet! There are certain circumstances when you might find it useful, but you should only enable it if you know exactly what you are doing. Generally, it is almost always best to keep anonymous_enable set to NO. Especially if you allow users to write files to your FTP server, then it is very important to have anonymous_enable set to NO.
If you make any changes to the file, switch vi to command mode, save the changes, and then exit vi. Then restart the vsftpd server so it reads its new directives:
sudo service vsftpd restart
Your Ubuntu machine should now have a functional FTP server.
==================================================
Installing & Configuring Sandalone PROFTPD Server in Ubuntu
How to install Proftpd in Ubuntu 10.x and 11.x
Answer:
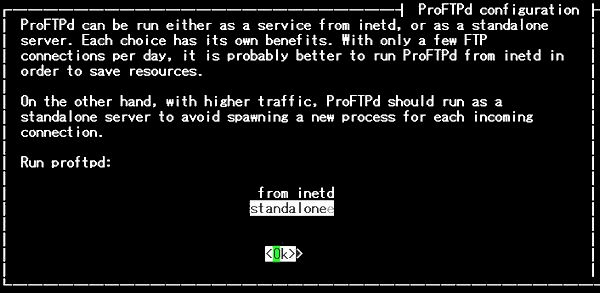
sudo apt-get install proftpdDuring installation you can choose to install as an inetd service,or a standalone server. I read and followed the advice of installing as Standalone server 
Backup the configuration file incase you mess something up!sudo cp /etc/proftpd/proftpd.conf /etc/proftpd/proftpd.conf.originalOpen the config for editsudo nano /etc/proftpd/proftpd.conf Change your server name to whatever you likeServerName "whatever.mydomain.com"Uncomment the line to restrict users to their home directoryDefaultRoot ~Save your changes and then restart the servicesudo service proftpd restartAnd you can put a custom message in any folder to have it displayed when accessedsudo nano /home/username/.message
save and exit ========================================================================================== By default, Ubuntu or most Linux distributions do not come with FTP servers installed. And the most popular FTP server in the Linux ecosystem is VSFTPD server. When it is installed and configured, you’ll be able to upload/download files to and from a Linux server, including Ubuntu and this tutorial is going to show you how to make that happen.
Objectives:
- Install and Configure VFTPD in Ubuntu 12.04
- Enjoy!
To get started, press Ctrl – Alt – T on your keyboard to open Terminal. When it opens, run the commands below to install VSFTPD.
sudo apt-get install vsftpd

After installing, run the commands to open vsftpd.conf file.
sudo gedit /etc/vsftpd.conf

Finally, edit the three lines highlighted below and save the file.
#anonymous_enable=YES
local_enable=YES
write_enable=YES

Restart the server by running the commands below.
sudo service vsftpd restart

The important to remember when editing the file is to comment out ( # ) anonymous_enable=YES and remove the comments for both local_enable=YES and write_enable=YES.
When editing vsftpd.conf file from a server without GUI, you’ll have to run the commands below:
sudo vi /etc/vsftpd.conf
Then use the arrow keys to move up, down, left and right. Select the letter you want to delete and press X .
To insert characters, press I
When done, press Esc key and type this: :wq
====================================================
How To Install And Configure An FTP Server Under Ubuntu 11.04/10.10/10.04
To install an FTP server on Ubuntu 11.04/10.10/10.04, launch the Terminal and issue this command:
sudo apt-get install vsftpd
To configure your FTP server, you need to edit this conf file: /etc/vsftpd.conf. This can be done via the Terminal with this command:
gksu gedit /etc/vsftpd.conf
To enable/disable anonymous FTP, search for the following line in the /etc/vsftpd.conf file:
anonymous_enable=
YES --> Enabled
NO --> Disabled
To allow users to upload files to your FTP server, edit this line:
write_enable=YES
To allow/disallow local users to connect to your server, search for this line:
local_enable=
YES --> Allow
NO --> Disallow
For your modifications to be taken into account, you need to restart the FTP server with this command:
sudo /etc/init.d/vsftpd restar
How to install PureFTPd And MySQL on Ubuntu server
For the administration of the MySQL database you can use web based tools like phpMyAdmin which will also be installed in this howto. phpMyAdmin is a comfortable graphical interface which means you do not have to mess around with the command line.
1. Install Mysql and phpmyadmin
a. how to install mysql server
b. how to install phpmyadmin
2. Install PureFTPd With MySQL Support
apt-get install pure-ftpd-mysql
Then we create an ftp group (ftpgroup) and user (ftpuser) that all our virtual users will be mapped to. Replace the group- and userid 2001 with a number that is free on your system:
groupadd -g 2001 ftpgroup
useradd -u 2001 -s /bin/false -d /bin/null -c "pureftpd user" -g ftpgroup ftpuser
3. Create The MySQL Database For PureFTPd
Now we create a database called pureftpd and a MySQL user named pureftpd which the PureFTPd daemon will use later on to connect to the pureftpd database. run the following in phpmyadmin:
CREATE DATABASE pureftpd;
GRANT SELECT, INSERT, UPDATE, DELETE, CREATE, DROP ON pureftpd.* TO 'pureftpd'@'localhost' IDENTIFIED BY 'ftpdpass';
GRANT SELECT, INSERT, UPDATE, DELETE, CREATE, DROP ON pureftpd.* TO 'pureftpd'@'localhost.localdomain' IDENTIFIED BY 'ftpdpass';
FLUSH PRIVILEGES;
CREATE TABLE ftpd (
User varchar(16) NOT NULL default '',
status enum('0','1') NOT NULL default '0',
Password varchar(64) NOT NULL default '',
Uid varchar(11) NOT NULL default '-1',
Gid varchar(11) NOT NULL default '-1',
Dir varchar(128) NOT NULL default '',
ULBandwidth smallint(5) NOT NULL default '0',
DLBandwidth smallint(5) NOT NULL default '0',
comment tinytext NOT NULL,
ipaccess varchar(15) NOT NULL default '*',
QuotaSize smallint(5) NOT NULL default '0',
QuotaFiles int(11) NOT NULL default 0,
PRIMARY KEY (User),
UNIQUE KEY User (User)
) TYPE=MyISAM;
4. Configure PureFTPd
Edit /etc/pure-ftpd/db/mysql.conf
cp /etc/pure-ftpd/db/mysql.conf /etc/pure-ftpd/db/mysql.conf_orig
cat /dev/null > /etc/pure-ftpd/db/mysql.conf
sudo nano /etc/pure-ftpd/db/mysql.conf
It should look like this:
MYSQLSocket      /var/run/mysqld/mysqld.sock
#MYSQLServer     localhost
#MYSQLPort       3306
MYSQLUser       pureftpd
MYSQLPassword   ftpdpass
MYSQLDatabase   pureftpd
#MYSQLCrypt md5, cleartext, crypt() or password() - md5 is VERY RECOMMENDABLE uppon cleartext
MYSQLCrypt      md5
MYSQLGetPW      SELECT Password FROM ftpd WHERE User="\L" AND status="1" AND (ipaccess = "*" OR ipaccess LIKE "\R")
MYSQLGetUID     SELECT Uid FROM ftpd WHERE User="\L" AND status="1" AND (ipaccess = "*" OR ipaccess LIKE "\R")
MYSQLGetGID     SELECT Gid FROM ftpd WHERE User="\L"AND status="1" AND (ipaccess = "*" OR ipaccess LIKE "\R")
MYSQLGetDir     SELECT Dir FROM ftpd WHERE User="\L"AND status="1" AND (ipaccess = "*" OR ipaccess LIKE "\R")
MySQLGetBandwidthUL SELECT ULBandwidth FROM ftpd WHERE User="\L"AND status="1" AND (ipaccess = "*" OR ipaccess LIKE "\R")
MySQLGetBandwidthDL SELECT DLBandwidth FROM ftpd WHERE User="\L"AND status="1" AND (ipaccess = "*" OR ipaccess LIKE "\R")
MySQLGetQTASZ   SELECT QuotaSize FROM ftpd WHERE User="\L"AND status="1" AND (ipaccess = "*" OR ipaccess LIKE "\R")
MySQLGetQTAFS   SELECT QuotaFiles FROM ftpd WHERE User="\L"AND status="1" AND (ipaccess = "*" OR ipaccess LIKE "\R")
Make sure that you replace the string ftpdpass with the real password for the MySQL user pureftpd in the line MYSQLPassword! Please note that we use md5 as MYSQLCrypt method, which means we will store the users' passwords as an MD5 string in the database which is far more secure than using plain text passwords!
Then create the file /etc/pure-ftpd/conf/ChrootEveryone which simply contains the string yes:
echo "yes" > /etc/pure-ftpd/conf/ChrootEveryone
This will make PureFTPd chroot every virtual user in his home directory so he will not be able to browse directories and files outside his home directory.
Also create the file /etc/pure-ftpd/conf/CreateHomeDir which again simply contains the string yes:
echo "yes" > /etc/pure-ftpd/conf/CreateHomeDir
This will make PureFTPd create a user's home directory when the user logs in and the home directory does not exist yet.
Afterwards, we restart PureFTPd:
sudo /etc/init.d/pure-ftpd-mysql restart
5. Populate The Database And Test
By using phpMyadmin, we create the user exampleuser with the status 1 (which means his ftp account is active), the password secret (which will be stored encrypted using MySQL's MD5 function), the UID and GID 2001 (use the userid and groupid of the user/group you created at the end of step two!), the home directory /home/www.example.com, an upload and download bandwidth of 100 KB/sec. (kilobytes per second), and a quota of 50 MB:
INSERT INTO `ftpd` (`User`, `status`,
`Password`, `Uid`, `Gid`, `Dir`, `ULBandwidth`, `DLBandwidth`,
`comment`, `ipaccess`, `QuotaSize`, `QuotaFiles`) VALUES ('exampleuser',
'1', MD5('secret'), '2001', '2001', '/home/www.example.com', '100',
'100', '', '*', '50', '0');
Now open your FTP client program on your work station and try to connect. You shuld be able to connect.
Now, if you run:
ls -l /home
you should see that the directory /home/www.example.com (exampleuser's home directory) has been automatically created, and it is owned by ftpuser and ftpgroup (the user/group we created at the end of step two):
user@ubuntu:~# ls -l /home
total 8
drwxr-xr-x 2 administrator administrator 4096 2010-10-18 11:35 administrator
drwxr-xr-x 2 ftpuser       ftpgroup      4096 2010-10-29 14:29 www.example.com
Insert users with phpMyadmin:
For most people it is easier if they have a graphical front-end to MySQL; therefore you can also use phpMyAdmin to administrate the pureftpd database.

Whenever you want to create a new user, you have to create an entry in the table ftpd so I will explain the columns of this table here:
a. User: The name of the virtual PureFTPd user (e.g. exampleuser).
b. status: 0 or 1. 0 means the account is disabled, the user cannot login.
c. Password: The password of the virtual user. Make sure you use MySQL's MD5 function to save the password encrypted as an MD5 string:

d. UID: The userid of the ftp user you created at the end of step two (e.g. 2001).
e. GID: The groupid of the ftp group you created at the end of step two (e.g. 2001).
f. Dir: The home directory of the virtual PureFTPd user (e.g. /home/www.example.com). If it does not exist, it will be created when the new user logs in the first time via FTP. The virtual user will be jailed into this home directory, i.e., he cannot access other directories outside his home directory.
g. ULBandwidth: Upload bandwidth of the virtual user in KB/sec. (kilobytes per second). 0 means unlimited.
h. DLBandwidth: Download bandwidth of the virtual user in KB/sec. (kilobytes per second). 0 means unlimited.
i. comment: You can enter any comment here (e.g. for your internal administration) here. Normally you leave this field empty.
j. ipaccess: Enter IP addresses here that are allowed to connect to this FTP account. * means any IP address is allowed to connect.
k. QuotaSize: Storage space in MB (not KB, as in ULBandwidth and DLBandwidth!) the virtual user is allowed to use on the FTP server. 0 means unlimited.
l. QuotaFiles: amount of files the virtual user is allowed to save on the FTP server. 0 means unlimited.
===================================================
|
FTP Server - Vsftpd
|
|
Install Vsftpd to configure FTP server to transfer files.
|
|
| [1] | Install Vsftpd |
root@www:~#aptitude -y install vsftpd
root@www:~#vi /etc/vsftpd.conf
# line 23: change( disable anonymous )
anonymous_enable=NO
# line 26: uncomment
local_enable=YES
# line 29: uncomment
write_enable=YES
# line 97,98: uncomment ( allow ascii mode transfer )
ascii_upload_enable=YES
ascii_download_enable=YES
# line 120: uncomment ( enable chroot )
chroot_local_user=YES
# line 121: uncomment ( enable chroot list )
chroot_list_enable=YES
# line 123: uncomment ( enable chroot list )
chroot_list_file=/etc/vsftpd.chroot_list
# line 129: uncomment
ls_recurse_enable=YES
# add at the last line
# specify root directory ( if don't specify, users' home directory become FTP home directory)
local_root=public_html
# use localtime
use_localtime=YES
root@www:~#
vi /etc/vsftpd.chroot_list
# add users you allow to move over their home directory
pangolin
vsftpd stop/waiting
vsftpd start/running, process 1507
| [1] | Install ProFTPD |
root@www:~#
aptitude -y install proftpd
# select standalone
root@www:~#
vi /etc/proftpd/proftpd.conf
# line 11: turn off if not needed
UseIPv6
off
# line 15: change to your hostname
ServerName
"www"
# line 34: uncomment ( specify root directory for chroot )
DefaultRoot ~
root@www:~#
vi /etc/ftpusers
# add users you prohibit FTP connection
test
service proftpd restart
=================================================
Setting Up vsftpd + TLS On Debian Squeeze
FTP is a very insecure protocol because all passwords and all data are transferred in clear text. By using TLS, the whole communication can be encrypted, thus making FTP much more secure. This article explains how to set up vsftpd with TLS on a Debian Squeeze server.I do not issue any guarantee that this will work for you!
1 Preliminary Note
In this tutorial I use the hostname server1.example.com with the IP address 192.168.0.100. These settings might differ for you, so you have to replace them where appropriate.2 Installing vsftpd And OpenSSL
OpenSSL is needed by TLS; to install vsftpd and OpenSSL, we simply run:
apt-get install vsftpd openssl
3 Creating The SSL Certificate For TLS
In order to use TLS, we must create an SSL certificate. I create it in /etc/ssl/private - if the directory doesn't exist, create it now::
mkdir -p /etc/ssl/private
chmod 700 /etc/ssl/private
Afterwards, we can generate the SSL certificate as follows:chmod 700 /etc/ssl/private
openssl req -x509 -nodes -days 365 -newkey rsa:1024 -keyout /etc/ssl/private/vsftpd.pem -out /etc/ssl/private/vsftpd.pem
Country Name (2 letter code) [AU]: <-- Enter your Country Name (e.g., "DE").State or Province Name (full name) [Some-State]: <-- Enter your State or Province Name.
Locality Name (eg, city) []: <-- Enter your City.
Organization Name (eg, company) [Internet Widgits Pty Ltd]: <-- Enter your Organization Name (e.g., the name of your company).
Organizational Unit Name (eg, section) []: <-- Enter your Organizational Unit Name (e.g. "IT Department").
Common Name (eg, YOUR name) []: <-- Enter the Fully Qualified Domain Name of the system (e.g. "server1.example.com").
Email Address []: <-- Enter your Email Address.
4 Enabling TLS In vsftpd
In order to enable TLS in vsftpd, open /etc/vsftpd.conf...
vi /etc/vsftpd.conf
... and add or change the following options:[...]
# Turn on SSL
ssl_enable=YES
# Allow anonymous users to use secured SSL connections
allow_anon_ssl=YES
# All non-anonymous logins are forced to use a secure SSL connection in order to
# send and receive data on data connections.
force_local_data_ssl=YES
# All non-anonymous logins are forced to use a secure SSL connection in order to send the password.
force_local_logins_ssl=YES
# Permit TLS v1 protocol connections. TLS v1 connections are preferred
ssl_tlsv1=YES
# Permit SSL v2 protocol connections. TLS v1 connections are preferred
ssl_sslv2=NO
# permit SSL v3 protocol connections. TLS v1 connections are preferred
ssl_sslv3=NO
# Disable SSL session reuse (required by WinSCP)
require_ssl_reuse=NO
# Select which SSL ciphers vsftpd will allow for encrypted SSL connections (required by FileZilla)
ssl_ciphers=HIGH
# This option specifies the location of the RSA certificate to use for SSL
# encrypted connections.
rsa_cert_file=/etc/ssl/private/vsftpd.pem
[...]
f you use force_local_logins_ssl=YES and force_local_data_ssl=YES, then only TLS connections are allowed (this locks out any users with old FTP clients that don't have TLS support); by using force_local_logins_ssl=NO and force_local_data_ssl=NO both TLS and non-TLS connections are allowed, depending on what the FTP client supports.
Apart from the TLS options, make sure you also have the following settings in your vsftpd.conf to enable non-anonymous logins:
In FileZilla, open the Server Manager:
==================================================
[...]
# Uncomment this to allow local users to log in.
local_enable=YES
#
# Uncomment this to enable any form of FTP write command.
write_enable=YES
#
# Default umask for local users is 077. You may wish to change this to 022,
# if your users expect that (022 is used by most other ftpd's)
local_umask=022
[...]
# You may restrict local users to their home directories.  See the FAQ for
# the possible risks in this before using chroot_local_user or
# chroot_list_enable below.
chroot_local_user=YES
[...]
Restart vsftpd afterwards:
/etc/init.d/vsftpd restart
That's it. You can now try to connect using your FTP client; however,
you should configure your FTP client to use TLS (this is a must if you
use force_local_logins_ssl=YES and force_local_data_ssl=YES) - see the next chapter how to do this with FileZilla.5 Configuring FileZilla For TLS
In order to use FTP with TLS, you need an FTP client that supports TLS, such as FileZilla.In FileZilla, open the Server Manager:
==================================================
Installation and Basic Configuration of VSFTPD as a FTP Server - Ubuntu Linux
==========================================================================================


No comments:
Post a Comment